SpringBoot Part3 (3)
Form
@Controller
public class CustomerController {
private static final Logger logger = LoggerFactory.getLogger(CustomerController.class);
private final CustomerService customerService;
public CustomerController(CustomerService customerService) {
this.customerService = customerService;
}
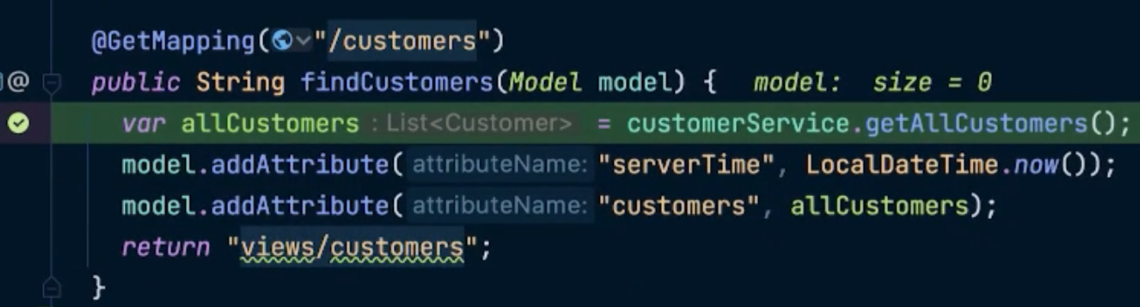
@GetMapping( "/customers")
public String findCustomers(Model model){
var allCustomers = customerService.getAllCustomers();
// 이름에 해당하는 veiw를 찾고 해당 view가 랜더링 된다. -> 해당 view customers.jsp가 WEB-INF안에 존재해야한다.\\
model.addAttribute("serverTime", LocalDateTime.now());
model.addAttribute("customers",allCustomers);
return "views/customers";
}
@GetMapping( "/customers/{customerId}")
public String findCustomer(@PathVariable("customerId") UUID customerId, Model model){
// PathVariable을 통해 값이 들어오며 자동으로 형변환을해준다. 실패하면 에러
var maybeCustomer = customerService.getCustomer(customerId);
if(maybeCustomer.isPresent()){
model.addAttribute("customer",maybeCustomer.get());
return "views.customer-details";
}
return "views/404";
}
@GetMapping("/customers/new")
public String viewNewCustomerPage(){
return "views/new-customers";
}
@PostMapping("/customers/new")
public String addNewCustomerPage(CreateCustomerRequest createCustomerRequest){
// Spring MVC에서 form 데이터를 알아서 바꿔준다. field이름이 같아야함.
customerService.createCustomer(createCustomerRequest.email(),createCustomerRequest.name());
return "redirect:/customers";
}
}
controller는 외부로 부터 DTO로 받아서 Validation이나, http 핸들을 수행한다. 도메인 로직은 Service와 entity에서 수행
// 일종의 DTO
public record CreateCustomerRequest(String name, String email) {
}
@Service
public class CustomerServiceImpl implements CustomerService {

    private final CustomerRepository customerRepository;

    public CustomerServiceImpl(CustomerRepository customerRepository) {
        this.customerRepository = customerRepository;
    }

    @Override
    public List<Customer> getAllCustomers() {
        return customerRepository.findAll();
    }

    @Override
    public Customer createCustomer(String email, String name) {
        // Customer 객체를 생성하것은 service에서
        return customerRepository.insert(new Customer(UUID.randomUUID(), name,email, LocalDateTime.now()));
    }

    @Override
    public Optional<Customer> getCustomer(UUID customerId) {
        return customerRepository.findById(customerId);
    }
}
WebApplicationContext
: ApplicationContext를 상속하고 있으며, ServletContext에 접근할 수 있는 기능이 추가된 ApplicationContext

: ServletContext는 여러 Dispatcher Servelt에서 접근이 가능하다.
: 여러 Dispatcher Servelt과 ApplicationContext에 접근하는 상황에서 Dispatcher Servelt에서 만들어진 WebApplicationContext는 서로 어떠한 관계를 가질까 → 모든 WebApplicationContext가 접근 가능한 Root ApplicationContext가 필요
: ServeltContext가 만들어 질때, Root ApplicationContext가 만들어지고 ServeltContext안에 들어가있다.
Root ApplicationContext 등록
- web.xml에 등록
- 코드기반 등록 : ConxtLoaderListener


: 웹 어플리케이션 안에 servlet과 servletContext들 존재
: 요청이 들어오면 DispatcherServlet에서 WebAppliscationContext들을 조회해서 등록된 Bean들을 가져온다. (Controller들에게 요청을 위임)
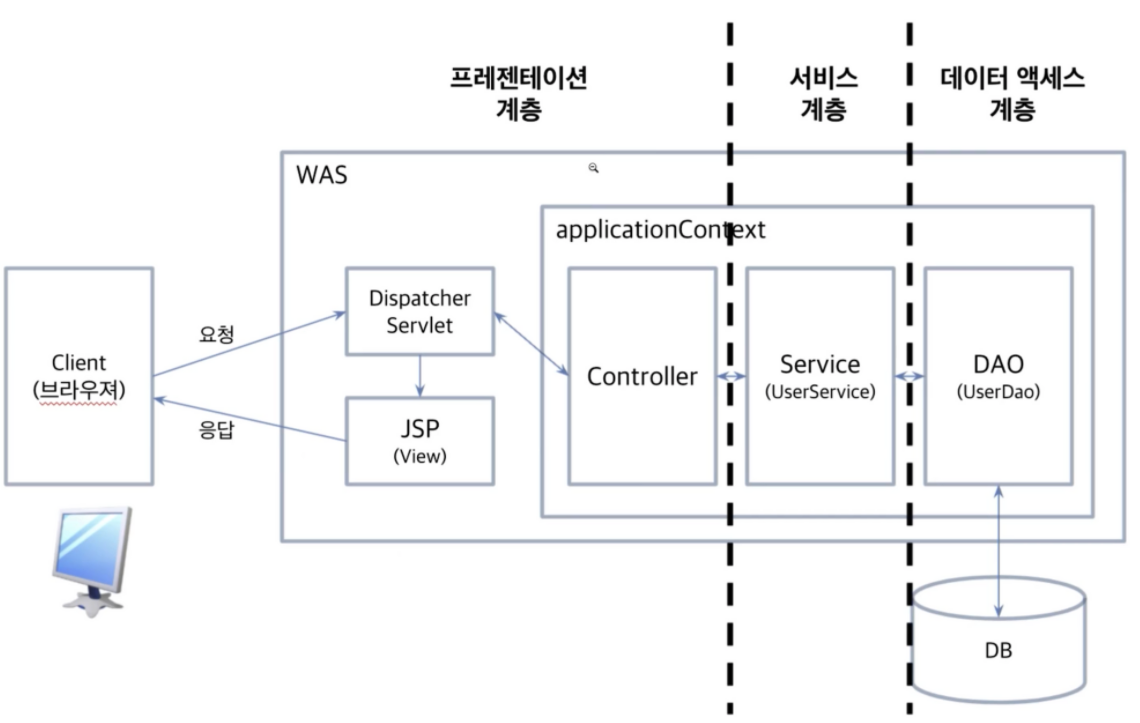
예전엔 DAO를 많이 썼으나 요즘엔 Repository를 많이 사용함.

모든 계층에서 Spring Framework의 Spring IoC container 기술이 사용된다.
: Spring MVC가 프레젠테이션 계층에 해당
: AoP는 모든 계층에서 전반적으로 사용
: model은 서비스 계층, 데이터 액세스 계층에서 사용
: DTO가 http 계층, 프레젠테이션 계층
: Spring JDBC는 데이터 엑세스 계층

applicationContext로 나눠서 보기
: Dispatcher Servlet은 여러개가 만들어질수있다.
: 각 servlet에 매핑된 controller에 servlet에 필요한 bean들이 등록된다. (adepter, handler, resolver 등)
: root ApplicationContext는 하나만 만들어지고 자식 servelt들에서 공통으로 사용되는 영역
하나의 servlet으로만 만들어지면 root가 따로 없다. 하나의 applicationContext에 모든 been들이 등록되며 수직확장이 가능.
Root ApplicationContext 를 만들어서 Service, Repository 관련 Bean들을 관리하고 dispatcher Servlet에는 MVC관련 내용만 등록을 하려 부모-자식으로 연결시켜보기
public class KdtWebApplicationInitializer implements WebApplicationInitializer {

    private static final Logger logger = LoggerFactory.getLogger(KdtWebApplicationInitializer.class);

    @EnableWebMvc
    @Configuration
    @ComponentScan(basePackages = "org.prgrms.kdt.customer",
        includeFilters = @ComponentScan.Filter(type = FilterType.ASSIGNABLE_TYPE, value = CustomerController.class),
        useDefaultFilters = false)
		// root가 아니니까 controller만 scan
    static class ServletConfig implements WebMvcConfigurer, ApplicationContextAware {

        ApplicationContext applicationContext;
        @Override
        public void configureViewResolvers(ViewResolverRegistry registry) {
            //registry.jsp();

            var springResourceTemplateResolver = new SpringResourceTemplateResolver();
            springResourceTemplateResolver.setApplicationContext(applicationContext);
            springResourceTemplateResolver.setPrefix("/WEB-INF/");
            springResourceTemplateResolver.setSuffix(".html");
            var springTemplateEngine = new SpringTemplateEngine();
            springTemplateEngine.setTemplateResolver(springResourceTemplateResolver);

            var thymeleafViewResolver = new ThymeleafViewResolver();
            thymeleafViewResolver.setTemplateEngine(springTemplateEngine);
            thymeleafViewResolver.setOrder(1);
            thymeleafViewResolver.setViewNames(new String[]{"views/*"});
            registry.viewResolver(thymeleafViewResolver);
        }

        // 정적 리소스
        @Override
        public void addResourceHandlers(ResourceHandlerRegistry registry) {
            registry.addResourceHandler("/resources/**")
                    .addResourceLocations("/resources/")
                    .setCachePeriod(60) // 캐시보관 시간
                    .resourceChain(true)
                    .addResolver(new EncodedResourceResolver()); // 알아서 압축해줌
        }

        @Override
        public void setApplicationContext(ApplicationContext applicationContext) throws BeansException {
            this.applicationContext = applicationContext;
        }
    }

    @Configuration
    @EnableTransactionManagement
    @ComponentScan(basePackages = "org.prgrms.kdt.customer",
                  excludeFilters = @ComponentScan.Filter(type = FilterType.ASSIGNABLE_TYPE, value = CustomerController.class))// root가 아니니까 controller만 scan
    //root - controller 제외하고 scan
		static class RootConfig{
        @Bean
        public DataSource dataSource() {
            HikariDataSource dataSource = DataSourceBuilder.create()
                    .url("jdbc:mysql://localhost/order_mgmt")
                    .username("root")
                    .password("dudwl0804!")
                    .type(HikariDataSource.class) // datasource 만들 구현체 타입 지정
                    .build();
            return dataSource;
        }

        @Bean
        public NamedParameterJdbcTemplate jdbcTemplate(DataSource dataSource) {
            return new NamedParameterJdbcTemplate(dataSource);
        }

        @Bean
        public PlatformTransactionManager platformTransactionManager(DataSource dataSource){
            return new DataSourceTransactionManager(dataSource);
        }

        @Bean
        public TransactionTemplate transactionTemplate(PlatformTransactionManager platformTransactionManager){
            return new TransactionTemplate(platformTransactionManager);
        }
    }

    @Override
    public void onStartup(ServletContext servletContext) {
        logger.info("starting server...");

        //rootApplicationContext을 만들기 위해 ContextLoaderListener 추가하기
        var rootApplicationContext = new AnnotationConfigWebApplicationContext();
        rootApplicationContext.register(RootConfig.class);
        var loaderListener = new ContextLoaderListener(rootApplicationContext);
        servletContext.addListener(loaderListener);

        // --------------------------------------------------------

        // servlet은 여러개를 등록할 수 있다.
        var applicationContext = new AnnotationConfigWebApplicationContext();
        applicationContext.register(ServletConfig.class);

        var dispatcherServlet = new DispatcherServlet(applicationContext);
        var servletRegistration = servletContext.addServlet("test", dispatcherServlet);
        servletRegistration.addMapping("/");
        servletRegistration.setLoadOnStartup(0);
        // default -1 : load가 안되다가 api 호출이 오면 그때 load됨
    }
}

컨트롤러를 디버깅하여 DispatcherServlet에 webApplicationContext에 Parent가 있는 것을 확인해보기
⇒ 자식 servlet은 여러개를 등록할 수 있다. 도메인에 따라 customer, order 등등. applicationContext 기준으로 나눈것. 이것이 좀더 전통적이 방식.
최근에는 MSA에 따라 container 자체로 (서버 자체로) 분리하는 형태를 가져가고있다.
REST(ful) API
REST
: 하이퍼미디어 시스템을 위한 소프트웨어 아키텍처의 한 형식
: 네트워크 아키텍처 원리의 모음
: 간단한 의미로, 웹 상의 자료를 HTTP위에서 SOAP이나 쿠키를 통한 세션 트랙킹 같은 별도의 전송 계층없이 전송하기 위한 아주 간단한 인터페이스
API
: 통신을 하기 위해 정의된 방법들. 규약 프로토콜
REST 아키텍처 스타일
- 클라이언트 - 서버
- 스테이트리스
- 캐시
- 균일한 인터페이스 : URI로 지정한 리소스에 대한 조작을 통일되고 한정적인 인터페이스로 수행하는 아키텍처
- 계층화된 시스템
Richardson Maturity Model : REST API를 얼마나 충족 시키는가의 지표
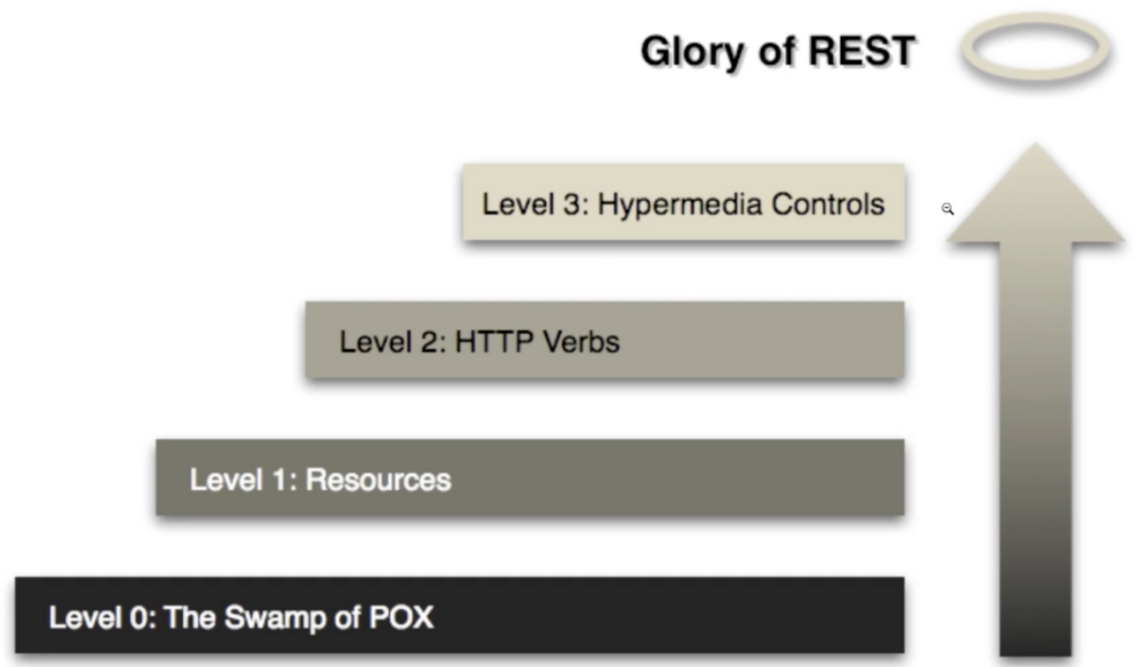
level 0 : API를 만들어 http로 resource 전달했다. soap 기반의 프로토콜 (URL이 하나)
level 1 : resources : 여러개의 end point가 생기고, end point는 resources 중심으러 설계된다. → representation 가능
level 2 : method 사용 (GET,POST, ..)
level 3 : HATEOAS 지원
representation
resource를 표현방식에 따라 분리 시킬 수 있다. 하나의 정보가 다양한 방식으로 표출될 수 있다. representation data는 representation metadata에 따라 다르게 표출.
HATEOAS
Hypermedia as the Engine of Application State
: 모든 리소스의 연결성
→ 이렇게 까지 해야하나 싶을 수 있지만,.. 알아두면 좋다.
API 설계
- URI는 정보의 자원을 표현해야한다. (리소스명은 동사보다는 명사를 사용)
- 자원에 대한 행위는 HTTP Method로 표현
- 슬래시 구분자는 계층 관계를 나타내는 데 사용
- URI 마지막 문자로 슬래시를 포함하지않는다.
- 하이픈은 URI가독성을 높이는데 사용
❌  GET /members/delete/1  → URI에 verb 즉, action이 오면 안된다.
⭕  DELET /members/1
⭕  POST /task/1/run → task를 실행시킨다 같은 action을 표현해야할때, 맨 끝에 단다.
RestContoroller 어노테이션
: Controller에 Spring에서 제공하는 ResponeseBody가 추가된것!
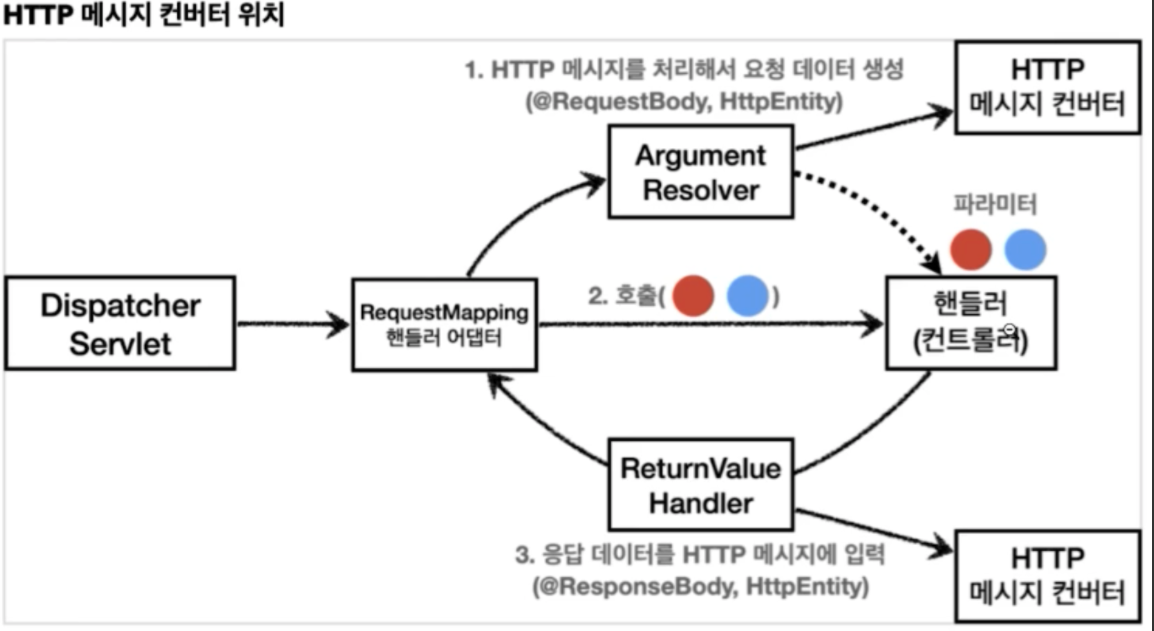
메세지 컨버터는 어디서 동작할까?
<!-- REST API 메세지 컴버터 -->
<dependency>
    <groupId>org.springframework</groupId>
    <artifactId>spring-oxm</artifactId>
</dependency>
<dependency>
    <groupId>com.thoughtworks.xstream</groupId>
    <artifactId>xstream</artifactId>
    <version>1.4.17</version>
</dependency>
--
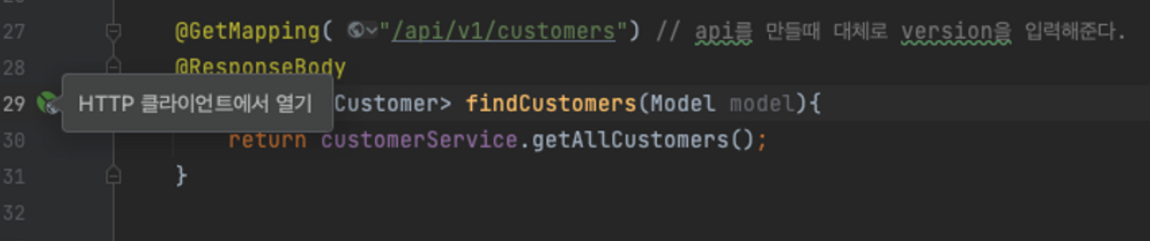
@GetMapping( "/api/v1/customers") // api를 만들때 대체로 version을 입력해준다.
@ResponseBody
public List<Customer> findCustomers(Model model){
    return customerService.getAllCustomers();
}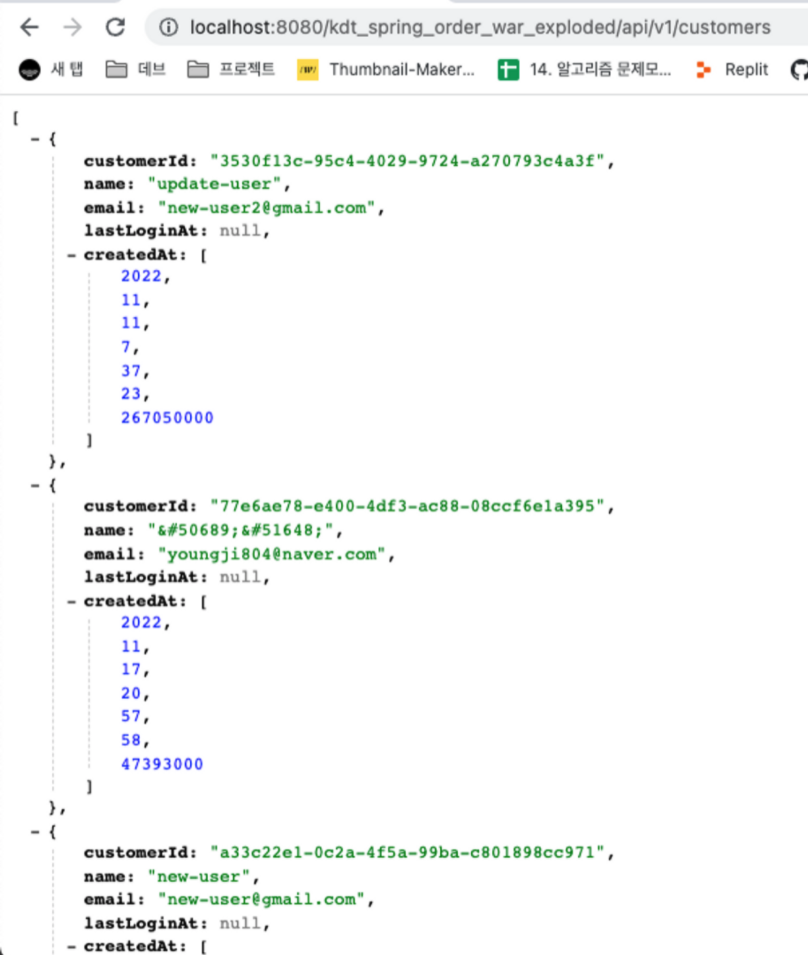
RequestResponeseBodyMethodProcesser Class → writeMessageConverters
message converter로 http 메소드로 응답된 object들이 httpMesssageConverter로 변환이 되어진다.
기본적으로 JSON으로 변환이 되며 변경하고 싶다면 WebMvcConfigurer를 상속받은 config class 에서 configureMessageConverter를 overriding 할 수 이있다.
static class ServletConfig implements WebMvcConfigurer, ApplicationContextAware {
ApplicationContext applicationContext;
@Override
public void configureViewResolvers(ViewResolverRegistry registry) {
...
}
@Override
public void addResourceHandlers(ResourceHandlerRegistry registry) {
...
}
@Override
public void setApplicationContext(ApplicationContext applicationContext) throws BeansException {
this.applicationContext = applicationContext;
}
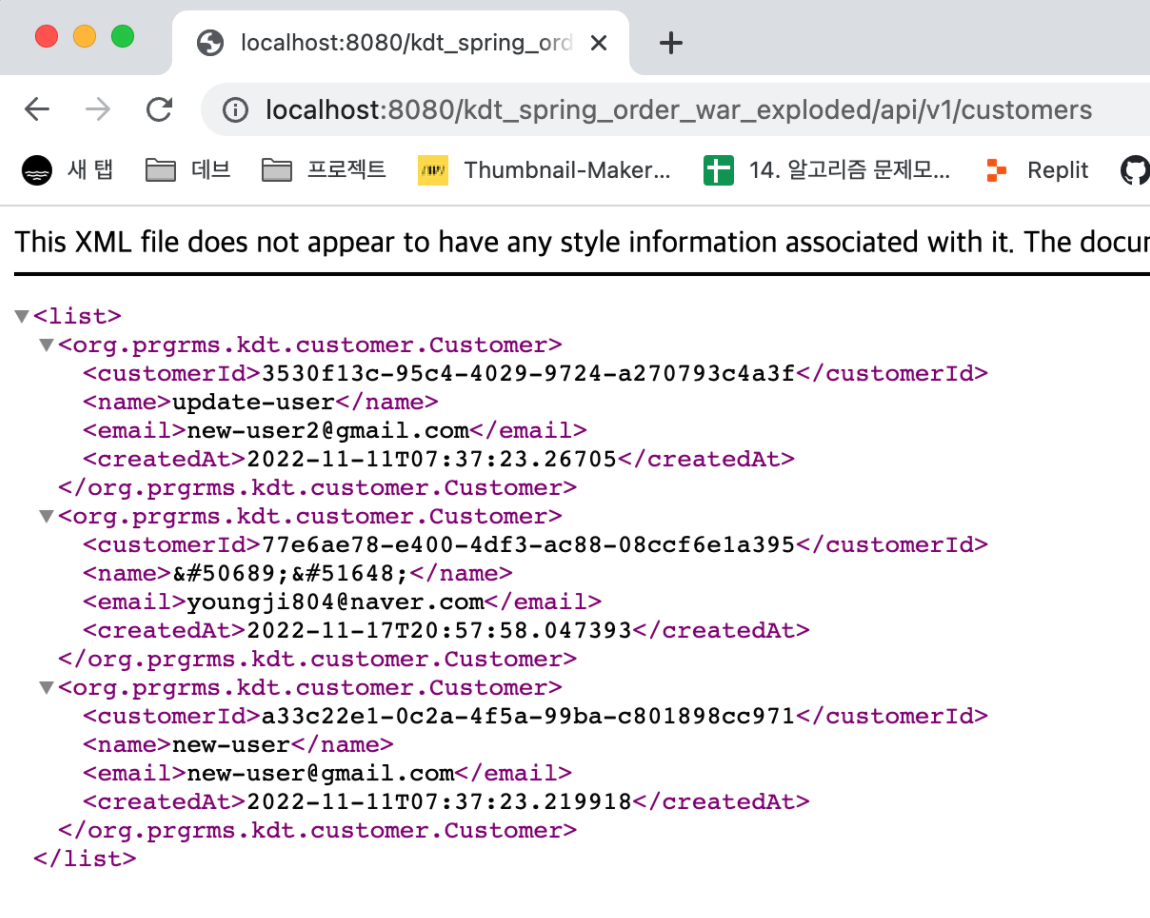
// xml로 변경
@Override
public void extendMessageConverters(List<HttpMessageConverter<?>> converters) {
// xml messageConverter
var messageConverter = new MarshallingHttpMessageConverter();
var xStreamMarshaller = new XStreamMarshaller();
messageConverter.setMarshaller(xStreamMarshaller);
messageConverter.setUnmarshaller(xStreamMarshaller);
converters.add(0,messageConverter); // 우선순위 0번으로 지정
// json 모듈 추가 : LocalTime 보기위해 추가
var javaTimeModule = new JavaTimeModule();
javaTimeModule.addSerializer(LocalDateTime.class, new LocalDateTimeSerializer(DateTimeFormatter.ISO_DATE));
//java object를 json으로 만들때 많이 쓰는 mapper Jackson2ObjectMapperBuilder
var module = Jackson2ObjectMapperBuilder.json().modules(javaTimeModule);
converters.add(1, new MappingJackson2HttpMessageConverter(module.build()));
}
}
request를 보낼때 context 타입 확인 방식
- IntelliJ
→ 메소드 좌측 버튼을 누르면 요청을 만들어준다.
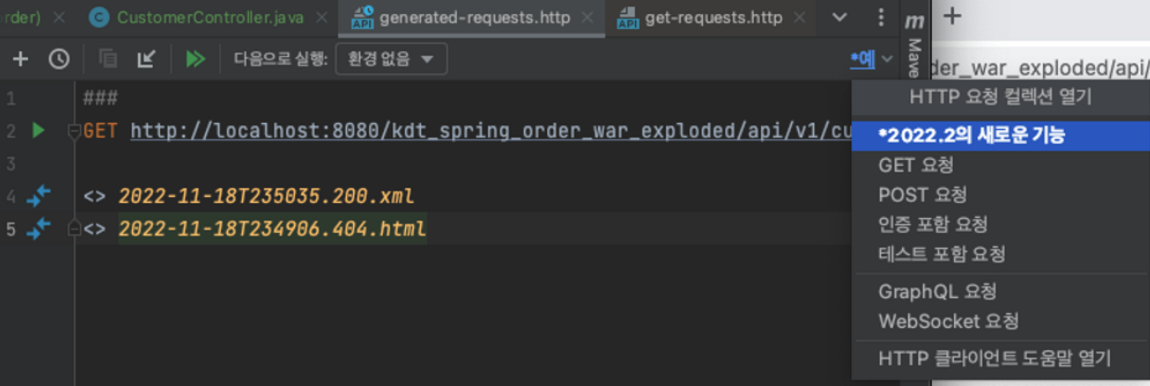
→ 헤더를 조작해서 요청가능

→ example을 통해 예시 확인 가능
- PostMan
상용api를 확인하거나, api가 많으면 그룹핑하고 관리를 할때 좋음.
출처 - 해리 : SpringBoot Part3
'Back-end 데브코스 > week 03 - 05 TIL (Spring)' 카테고리의 다른 글
| [TIL] 221117 - SpringBoot Part3 : AutoConfiguration (0) | 2022.11.24 |
|---|---|
| [TIL] 221117 - SpringBoot Part3 : 단일 페이지 웹 어플리케이션, CORS (0) | 2022.11.24 |
| [TIL] 221115 - SpringBoot Part3 : Spring MVC - jsp, Thymeleaf (0) | 2022.11.22 |
| [TIL] 221114 - SpringBoot Part3 : 웹 기술 Overview, Servelt (0) | 2022.11.22 |
| [TIL] 221111 - SpringBoot Part2 : 트랜잭션과 AoP (1) | 2022.11.22 |


댓글